接收到 SNS Health Check 失敗後使用 Lambda reboot EC2

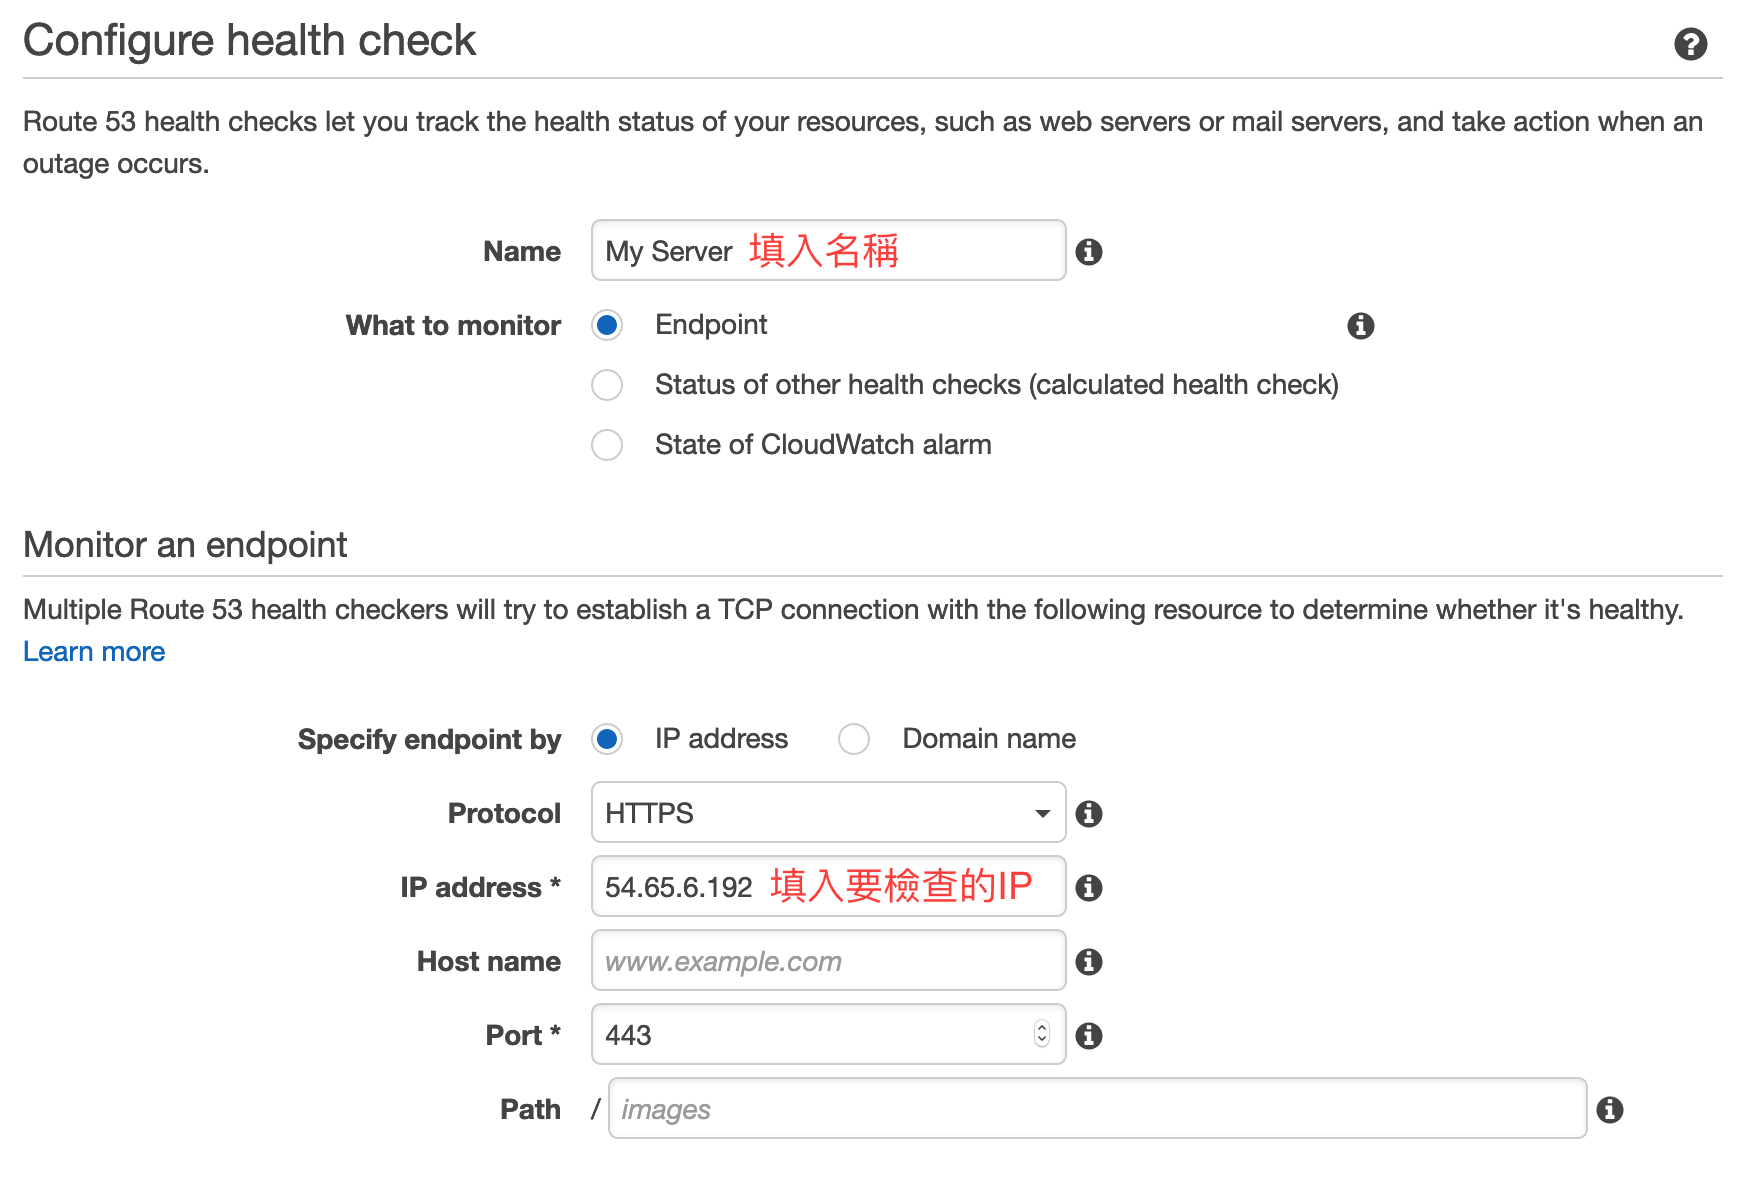
1. 先使用 Route 53 Health Checks 建立通知

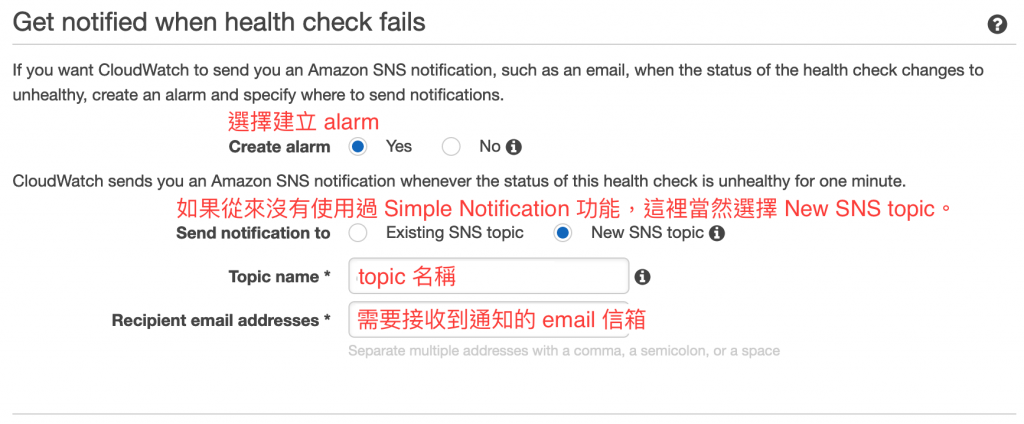
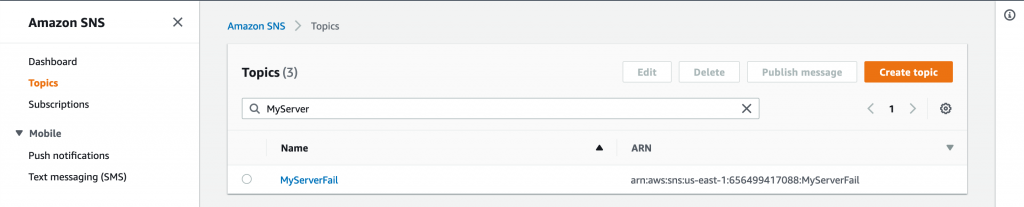
2. 接著設定 Get notified when health check fails,如果沒有建立過 SNS topic 先要先建立(這邊舉例 topic 名稱為 MyServerFail),建立完成的 topic 可以在 AWS Simple Notification Service 裡管理

可以在 AWS SNS 裡面管理 topics

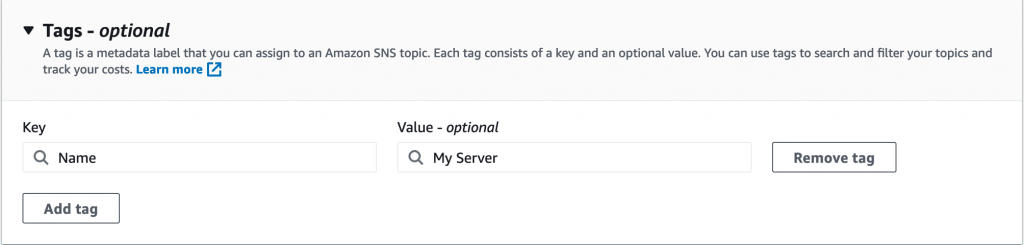
3. 因為我在 Lambda 上的程式碼需要從 SNS 裡設定的 Tags 抓取 EC2 Instance name 來重新啟動,所以需要在 AWS SNS 裡設定 Tags

Edit topic 的最下方可以新增 tag

4. 建立 Lambda Function

開啟 Lambda console,選擇 create function 輸入 function 名稱(例:auto-reboot-when-health-check-fail),runtime 選擇 Python 2.7,Execution role 的部份因為要使用 Lambda 在 health check 通知不正常時重新啟動 ec2 instance 所以需要有 AmazonEC2FullAccess ,如果你想要觀察 Lambda function print 出的訊息另外需要 CloudWatchLogsFullAccess

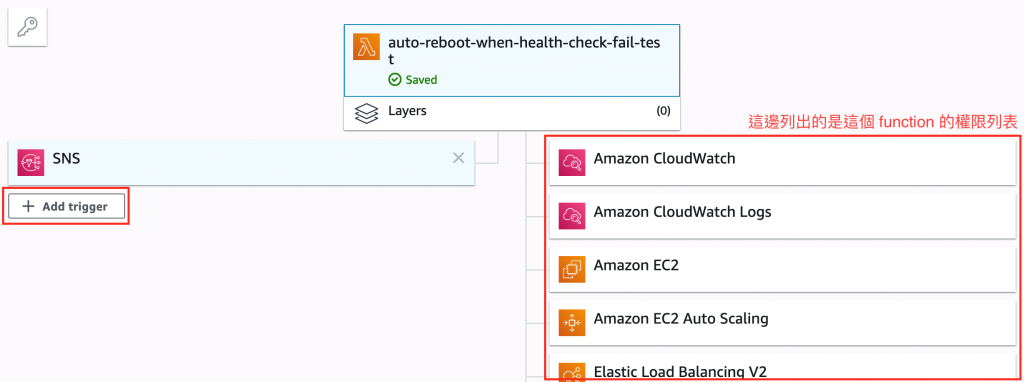
使用 Add trigger 加入觸發條件

5. 在 Function code 的位置貼上下列程式碼

變數 region 為服務區域的代號,這裡可以查詢。

import boto3

region = 'ap-northeast-1'
ec2 = boto3.resource('ec2')

def lambda_handler(event, context):
    # 將 SNS 裡設定的 tags 取出,用來辨別需要重啟哪個 instance
    tag = event['Records'][0]['Sns']['Tags'][0]
    #print("Tag Key: " + tag['Key'] + " / Value: " + tag['Value'])
    
    filters = [{
        'Name': 'tag:Name',
        'Values': [tag['Value']]
    }]
    
    instances = ec2.instances.filter(Filters=filters)
    RunningInstances = [instance.id for instance in instances]

    if len(RunningInstances) > 0:
        # 找到對應 tag 的 instance
        #print("instance.id : " + RunningInstances[0])
        ec2Client = boto3.client('ec2', region_name=region)
        ec2Client.reboot_instances(InstanceIds=[RunningInstances[0]])
        print('reboot your instances: ' + RunningInstances[0])
    else:
        print("none found")

6.接下來可以使用 test event 來測試

{
  "Records": [
    {
      "EventSource": "aws:sns",
      "EventVersion": "1.0",
      "EventSubscriptionArn": "你的 SNS ARN",
      "Sns": {
        "Type": "Notification",
        "MessageId": "95df01b4-ee98-5cb9-9903-4c221d41eb5e",
        "TopicArn": "arn:aws:sns:ap-northeast-1:123456789012:ExampleTopic",
        "Subject": "My Server Health Low",
        "Message": "My Server Health Low",
        "Tags": [
          {
            "Key": "Name",
            "Value": "你在 SNS topic 裡設定的 EC2 Instance Name"
          }
        ]
      }
    }
  ]
}

設定好之後關閉設定視窗就可以按下 Test 來測試看看了,按照設定的話接收到測試的 SNS 之後該對應的 EC2 Instance 就會重啟了。

以上就是我設定使用 Health check 來偵測,然後通知 Lambda 重啟 EC2 Instance 的方式,歡迎討論。

使用 Lambda 建立自動備份機器人

備份 EBS 應該是很常見的事務性工作,所以我在網上找到了資料來使用 Lambda 機器人,為我的 EBS 自動建立備份快照(snapshot)。

只要按照這三個步驟就可以建立一個 EBS 自動備份機器人

Step 1 – 建立 Lambda backup 程式碼

此 Lambda function 的主要用途有

  • 尋找在指定 region 內的所有 Instances
  • 根據 Tags 過濾出需要備份的 Instances – 這裡的 Tag key 會是 “Backup” 或是 “backup”
  • 辨認出在對應 Instances 上的 EBS
  • 開始建立備份的 EBS snapshot
  • 將一些設定的 Tags 加在備份的 snapshots 上
  • 回報狀態

Step 2 – 使用 Cloudwatch Events 觸發 Lambda backup 動作

Step 3 – 在 EC2 Dashboard 裡確認 EBS sanpshots 有被建立


事前準備

  • EC2 Server(s) – 設定 Tag 為 “Key = Backup”,”Value = Yes” 注意大小寫需相符
  • IAM ROLE – Lambda Service Role 需要有 EC2FullAccess 的權限

Step 1 – 建立 Lambda backup 程式碼

建立 Lambda backup ,環境選擇 python 2.7。
在 # 全域變數 區塊設定為與自己相應的設定。

import boto3
import collections
import datetime

#全域變數
globalVars  = {}
globalVars['Owner']                 = "Your-Name"
globalVars['Environment']           = "Production"
globalVars['REGION_NAME']           = "ap-northeast-1"
globalVars['tagName']               = "Serverless-Automated-Backup"
globalVars['findNeedle']            = "BackUp"
globalVars['RetentionTag']          = "DeleteOn"
globalVars['RetentionInDays']       = "30"

# Region 名稱
ec = boto3.client('ec2', region_name='ap-northeast-1')

def backup_bot():

    snapsCreated = { 'Snapshots':[], }

    filters = [
        {'Name': 'tag-key', 'Values': [ globalVars['findNeedle'] ]},
        {'Name': 'tag-value', 'Values': ['Yes']},
    ]

    reservations = ec.describe_instances( Filters=filters ).get( 'Reservations', [] )

    instances = sum(
        [
            [i for i in r['Instances']]
            for r in reservations
        ], [])

    # 列出 Instances 的數量 : %d" % len(instances)
    snapsCreated['InstanceCount']=len(instances)

    to_tag = collections.defaultdict(list)

    # 遍歷該 Region 所有的 Instances
    for instance in instances:
        try:
            retention_days = [
                int(t.get('Value')) for t in instance['Tags']
                if t['Key'] == 'Retention'][0]
        except IndexError:
            retention_days = int(globalVars['RetentionInDays'])

        # 取得所有的 EBS
        for dev in instance['BlockDeviceMappings']:
            if dev.get('Ebs', None) is None:
                continue
            vol_id = dev['Ebs']['VolumeId']

            # 遍歷 Tags 來收集 Instances 的 name
            DescriptionTxt = ''
            for tag in instance['Tags']:
                if tag['Key'] == 'Name' :
                    DescriptionTxt = tag['Value']

            snap = ec.create_snapshot( VolumeId=vol_id, Description=DescriptionTxt )

            to_tag[retention_days].append(snap['SnapshotId'])

            # Tag 所有的剛建立的 snapshots 加上 Deletion Date
            # 以 "DeleteOn" 管理所有的 snapshots 何時該被移除
            for retention_days in to_tag.keys():
                delete_date = datetime.date.today() + datetime.timedelta(days=retention_days)
                # format 日期
                delete_fmt = delete_date.strftime('%Y-%m-%d')
                # 建立 Name, DeleteOn Tag 在 EBS sanpshots 上
                ec.create_tags(
                                Resources=to_tag[retention_days],
                                Tags=[
                                        {'Key': globalVars['RetentionTag'], 'Value': delete_fmt},
                                        {'Key': 'Name', 'Value': snap['Description'] },
                                    ]
                            )
                snapsCreated['Snapshots'].append({ 'SnapshotId':snap['SnapshotId'], 'VolumeId' : vol_id, 'InstanceId' : instance['InstanceId'], 'DeleteOn': delete_fmt })

        to_tag.clear()

    return snapsCreated


def lambda_handler(event, context):
    return backup_bot()

if __name__ == '__main__':
    lambda_handler(None, None)

Step 2 – 使用 Cloudwatch Events 觸發 Lambda backup 動作

使用 Cloudwatch Event 呼叫 Lambda 進行備份

# 每 5 分鐘備份一次.
rate(5 minutes)
or
# 每天備份一次.
rate(1 day)
or
# 每天 12:00pm UTC 進行備份.
cron(0 12 * * ? *)

更多 Scheduled 表達式的使用, 請參考: CloudWatch – Schedule Expressions for Rules

Step 3 – 在 EC2 Dashboard 裡確認 EBS sanpshots 有被建立


翻譯自:https://github.com/miztiik/serverless-backup

WordPress 持續跳出 connection information

在 AWS EC2 上安裝完 WP 後如果在更新以及安裝佈景時跳出 connection information (如下圖)。


你可以在 wp-config.php 的 define(‘NONCE_SALT’, ‘….’); 下一行加上

define('FS_METHOD', 'direct');


官方說明在此:https://codex.wordpress.org/Editing_wp-config.php